

Getting Around Your System
Right so we’ve got Linux installed haven’t we. Your VM or WSL is running, you can log in, and you’re staring at the desktop or cli for WSL 1 and thinking “now what then?” – well Basic Linux Commands is where we need to start.
When I first installed Linux I sat there for about ten minutes just looking at it. Clicked a few things, opened some menus, still hadn’t a clue what I was supposed to do. All the tutorials I found were either completely basic (here’s how to open a file manager) or jumped straight into advanced stuff assuming you already knew your way around.
Spent the first week just randomly clicking things trying to figure out where everything was. Complete waste of time that was.
What you actually need is the terminal. That’s where everything happens for network automation. Not the graphical interface with all the menus and icons. The command line.
So that’s what we’re covering now. Basic Linux commands for moving around the system. Nothing fancy, just the essential commands you’ll use every single day.
Opening the Terminal
First job is actually getting to the terminal. On Ubuntu there’s a few ways to do it.
Keyboard shortcut is Ctrl+Alt+T. Press all three together and a terminal window opens. That’s the fastest way.
You can also click Activities in the top left corner, type “terminal” and it’ll show up. Or find it in the applications menu if you want to do it the long way.
Terminal window opens and you’re looking at something like this:
netadmin@ubuntu-vm:~$
That’s your prompt. It’s waiting for you to type commands.
Now if you’re used to SSH’ing into network devices this should feel familiar. Putty, SecureCRT, whatever you use. Same idea – you type commands, press Enter, see the output.
Main difference is you’re actually on the Linux machine instead of connecting to a remote device. But the workflow’s identical.
Understanding What That Prompt Means
Right so let’s break down what you’re looking at.
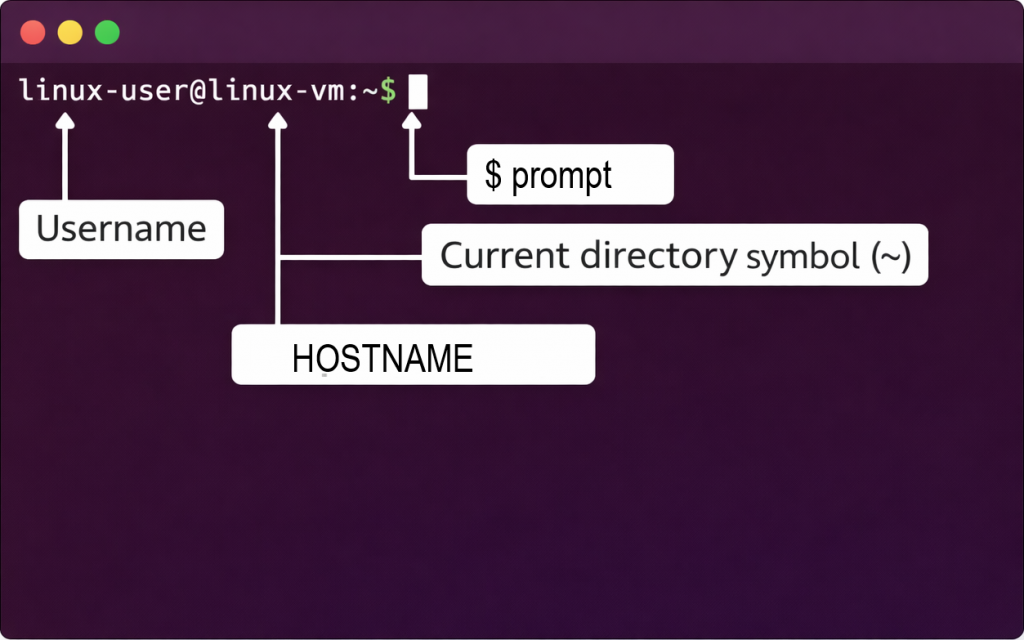
netadmin@ubuntu-vm:~$
netadmin – that’s your username. Whatever you set during installation.
ubuntu-vm – that’s the hostname. Name of your Linux machine.
~ – that’s your current location. The tilde means your home directory.
$ – that’s the prompt symbol. Means you’re a normal user. If you were root (administrator) it’d be a hash # instead.
So that prompt tells you who you are, what machine you’re on, and where you are in the file system. Quite useful actually.
On network devices the prompt usually shows you the hostname and maybe if you’re in config mode. Same concept really.
Finding Where You Are – pwd Command
So you’re in the terminal. Where exactly are you in the file system though?
That tilde in the prompt tells you you’re in your home directory, but what’s the actual path? Let’s find out.
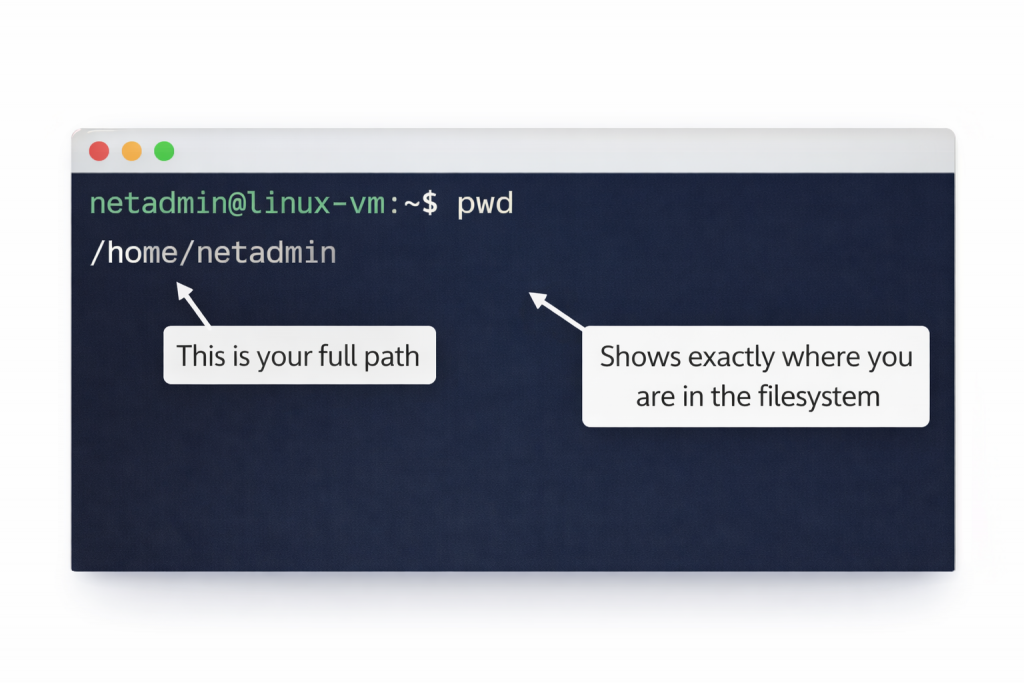
Type this: pwd then Press Enter and you’ll see something like: /home/netadmin
That’s your present working directory. That’s what pwd stands for – present working directory.
Every user on Linux has a home directory at /home/username. Yours is /home/netadmin or whatever your username is. That’s your personal space where you keep your files.
Why does this matter? Because when you’re running automation scripts or organizing config backups you need to know exactly where you are in the file system. Scripts use full paths. If you’re in the wrong directory your script won’t find the files it needs.
Had this happen when I was learning. Wrote a backup script that worked perfectly when I ran it from my home directory. Tried to run it from somewhere else and it couldn’t find anything. Took me ages to work out it was looking in the wrong place because I hadn’t used full paths.
pwd tells you exactly where you are. Use it whenever you’re not sure.
Seeing What’s There – ls Command
Right so you know where you are. What’s actually in this directory then?
Type this: ls
You’ll see a list of whatever’s in your current directory. On a fresh Ubuntu install probably Desktop, Documents, Downloads, Music, Pictures, that sort of thing.
That’s the basic ls command. Just lists files and directories. However, there’s more useful versions of it.
Try this: ls -l
Now you get much more information. File permissions, owner, size, modification date, all that stuff.
Output looks something like:

drwxr-xr-x 2 netadmin netadmin 4096 Dec 20 10:30 Desktop
drwxr-xr-x 2 netadmin netadmin 4096 Dec 20 10:30 Documents
drwxr-xr-x 2 netadmin netadmin 4096 Dec 20 10:30 Downloads
That first column (drwxr-xr-x) shows permissions. We’ll cover that properly in a later lesson. For now just know that d means it’s a directory, – means it’s a file.
File sizes appear in bytes. Modification dates show when things were last changed.
Much more useful than just the names isn’t it.
Now try this:
ls -la
Hidden Files
The ‘a’ stands for all. Shows hidden files too.
In Linux, files starting with a dot are hidden. Things like .bashrc or .ssh. Configuration files mostly. Normal ls doesn’t show them, ls -la does.
You’ll see a bunch of files starting with dots now. Don’t worry about what they all do yet. Just know they’re there.
One more useful variation:
ls -lh
The ‘h’ stands for human-readable. Shows file sizes as KB, MB, GB instead of just bytes.
drwxr-xr-x 2 netadmin netadmin 4.0K Dec 20 10:30 Desktop
drwxr-xr-x 2 netadmin netadmin 4.0K Dec 20 10:30 Documents
Much easier to read than seeing 4096 bytes isn’t it.
These ls options are what you’ll use constantly. ls -l for detailed view, ls -la to see everything including hidden files, ls -lh when you want readable file sizes.
Moving Around – cd Command
Right so you can see where you are and what’s there. Now let’s actually move to a different directory.
So the cd command changes directory. That’s literally what it stands for.
Let’s create a proper structure for network work so we can practice navigating. First we’ll make some directories – we’ll learn the mkdir command properly in Lesson 6, but for now just follow along. Type this:
mkdir network-data
That creates a new directory called network-data. Now let’s move into it:
cd network-data
Press Enter and your prompt changes:
netadmin@ubuntu-vm:~/network-data$
See how it now shows network-data instead of just the tilde? You’ve moved into that directory.
Type pwd to confirm:
pwd
Shows:
/home/netadmin/network-data
Brilliant. You’re in the network-data directory now.
Creating a Practice Directory Structure
Now make directories for different device types:
mkdir configs
mkdir logs
mkdir scripts
mkdir backups
Now check what you created:
ls -l
You’ll see your four new directories.
Let’s go into the configs directory:
cd configs
Your prompt changes to:
netadmin@ubuntu-vm:~/network-data/configs$
Now make directories for different device types:
mkdir routers
mkdir switches
mkdir firewalls
Check them with ls. Now here’s something useful. You’re in the configs directory but you want to see what’s in the routers directory without moving into it. Do this:
ls -l routers
You can give ls a path and it’ll show what’s in that directory without you having to cd into it first.
Different Ways to Use Paths
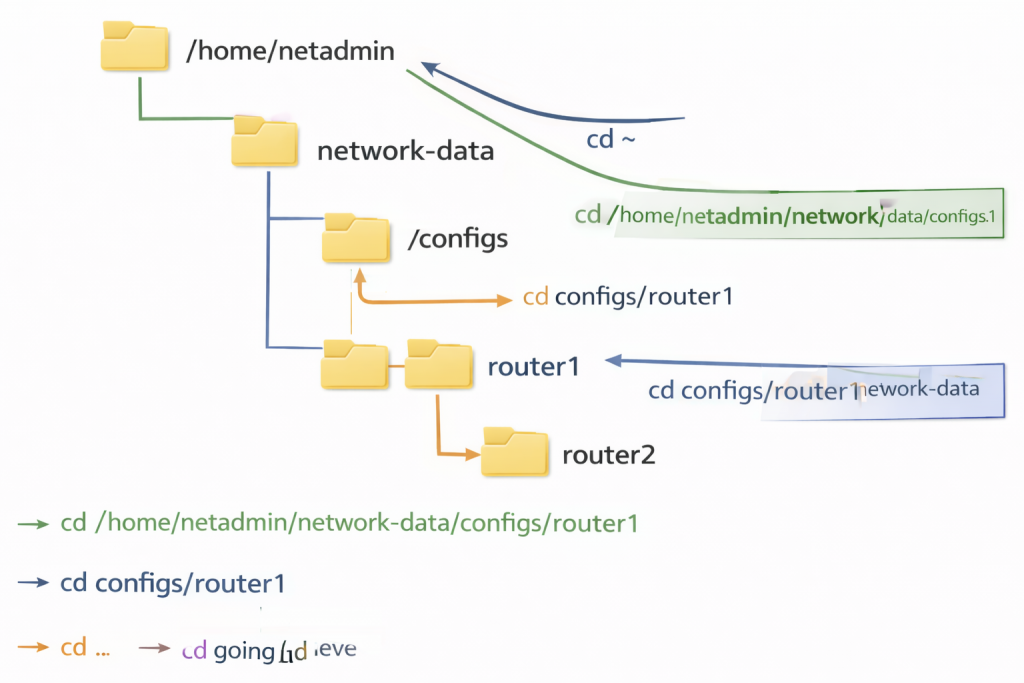
Right so there’s two ways to specify paths in Linux. Absolute paths and relative paths.
Absolute path starts from the root of the file system. Always begins with a forward slash.
Like this:
cd /home/netadmin/network-data/configs/routers
That works from anywhere. Doesn’t matter where you currently are, that absolute path takes you straight to the routers directory.
Relative path is relative to where you currently are.
Say you’re in /home/netadmin/network-data and you want to get to the routers directory inside configs. You can do:
cd configs/routers
No leading slash. That’s relative to your current location.
Both work. Absolute paths are safer for scripts because they always work regardless of where you run the script from. Relative paths are quicker to type when you’re working interactively.
Useful cd Shortcuts
Now, there’s some shortcuts with cd that’ll save you loads of time.
Getting Home Quickly
cd ~ or just cd with nothing after it – takes you straight to your home directory no matter where you are.
cd ~
Back to /home/netadmin. Quick way home.
Moving Up Directory Levels
cd .. – moves up one directory level.
Say you’re in /home/netadmin/network-data/configs/routers and you type:
cd ..
You’re now in /home/netadmin/network-data/configs. One level up.
You can chain them:
cd ../..
That moves up two levels. From routers to network-data in one command.
Returning to Previous Directory
cd – – goes back to your previous directory.
Say you’re in /home/netadmin/network-data/configs/routers and you cd to /var/log to check something. Type:
cd -
Takes you straight back to where you were before. Really handy when you’re jumping between two locations.

Putting It All Together – Realistic Workflow
Let’s do a proper network engineering workflow using these commands.
Say you’ve downloaded some device configs and you want to organize them. Here’s how you’d do it.
Start in your home directory:
cd ~
Check where you are:
pwd
Should show /home/netadmin.
Go to your network-data directory:
cd network-data
See what’s there:
ls -l
You’ve got your configs, logs, scripts, backups directories.
Move into configs:
cd configs
Check the structure:
ls -l
Shows routers, switches, firewalls directories.
Navigating Between Directories
Say you’ve got router configs to organize. Move to routers:
cd routers
Check what’s there (probably empty on a fresh system):
ls -l
Later you’ll copy config files here. For now let’s check the switches directory without leaving routers:
ls -l ../switches
That ../ means go up one level (to configs) then down into switches. Shows what’s in switches without you having to cd there.
Now go back to your home directory:
cd ~
Check where you are:
pwd
Back at /home/netadmin.
That’s a typical workflow. Moving around, checking directories, organizing files. You’ll do this constantly.
Case Sensitivity – This Will Trip You Up
Linux is case sensitive. This is important.
Desktop is not the same as desktop. Documents is not the same as documents.
Try this:
cd network-data
Works fine.
Now try:
cd Network-Data
Error. No such file or directory.
Because the directory is called network-data not Network-Data. Linux sees those as completely different things.
Coming from Windows this catches people out constantly. Windows doesn’t care about case. Linux absolutely does.
Same with commands:
ls
Works.
LS
Command not found.
Has to be lowercase.
Get used to this now. It’ll save you loads of frustration later.
Tab Completion – Your New Best Mate
Here’s something that’ll make your life much easier. Tab completion.
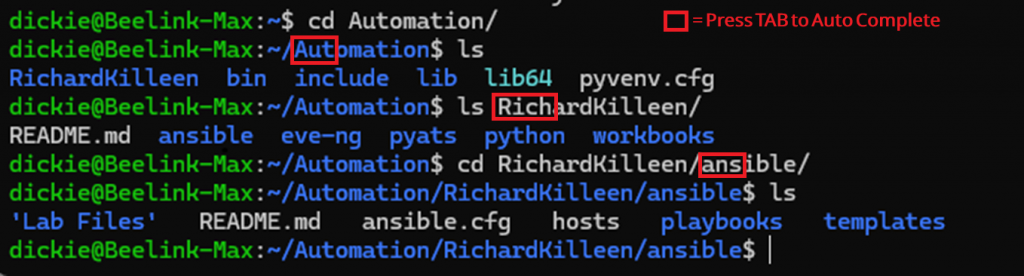
Start typing a directory name then press Tab. Linux will finish it for you.
Try this:
cd net
Don’t press Enter. Press Tab instead.
Linux completes it to:
cd network-data
Because network-data is the only thing starting with ‘net’ in your current directory.
If there’s multiple possibilities, press Tab twice and Linux shows them all.
Say you’ve got network-data, network-configs, network-logs all in the same directory. Type:
cd net
Press Tab twice. Shows all three options. Then type enough letters to make it unique and press Tab again.
cd network-d
Press Tab. Completes to network-data.
Tab completion works for commands too. Type part of a command and press Tab.
This is absolutely brilliant for long directory names or when you can’t quite remember the exact name. Just type enough to make it unique and let Tab do the work.
Right, this can save ridiculous amounts of typing. Use it all the time.
Common Mistakes People Make
Let me tell you about the mistakes I see constantly when people are learning this.
Forgetting where they are. They cd into six different directories, get completely lost, don’t know where they are. Use pwd. Use it liberally. No shame in checking.
Not using tab completion. Typing out full directory names when Tab would do it for you. Waste of time that is.
Missing the slash. Typing cd network-data/configs/routers when the directory is actually network-data/config/routers. Notice the difference? configs vs config. Check with ls first.
Using backslashes instead of forward slashes. Windows uses backslashes (). Linux uses forward slashes (/). Type cd network-data\configs and it won’t work. Has to be network-data/configs.
Assuming paths that don’t exist. Trying to cd somewhere that doesn’t exist yet. Use ls to check first.
Forgetting about case sensitivity. Type cd Desktop when the directory is actually called desktop. Won’t work.
Had all these happen when I was learning. Most frustrating one was case sensitivity. Coming from Windows I kept typing things wrong and couldn’t work out why it wasn’t finding directories that were definitely there.
Why This Actually Matters for Network Engineers
Right so you might be thinking this is all very basic. Why does this matter for network automation then?
Because everything you do in Linux starts with navigation. Every single automation task involves moving around the file system, finding files, organizing directories.
Backing up device configs? You’ll cd to your backup directory, create subdirectories for each site, organize files by device type.
Analyzing logs? You’ll cd to /var/log, grep through syslog files, copy interesting ones to your home directory for analysis.
Running automation scripts? You’ll cd to your scripts directory, check what’s there with ls, make sure the scripts have the right permissions.
Setting up scheduled tasks? You’ll cd to /etc/cron.d, ls to see what’s configured, cat to read cron files.
You cannot do any of that without knowing how to move around the file system. pwd, ls, and cd are fundamental. You’ll use them hundreds of times a day.
I’ve seen people try to skip the basics and jump straight into scripting. They write a backup script that should work but it fails because they don’t understand paths properly. Script can’t find the files because they’re in the wrong directory.
Or they run a script that works once then fails every other time because they’re running it from different directories and it’s using relative paths.
Get the basics solid now. Understand how navigation works. Everything else builds on this.
Organizing Network Data Properly
Let me show you a proper directory structure for network work. This is what you’ll actually use in real life.
Quick note: we’re using the mkdir command here to create our directory structure. We’ll learn mkdir properly in Lesson 6, but for now just follow along to get your directories set up so we have somewhere to organize files for the next few lessons.
Building Your Directory Structure
Create this structure in your home directory:
cd ~
mkdir -p network-data/{configs,logs,scripts,backups,documentation}
mkdir -p network-data/configs/{routers,switches,firewalls,wireless}
mkdir -p network-data/backups/{daily,weekly,monthly}
Now you’ve got:
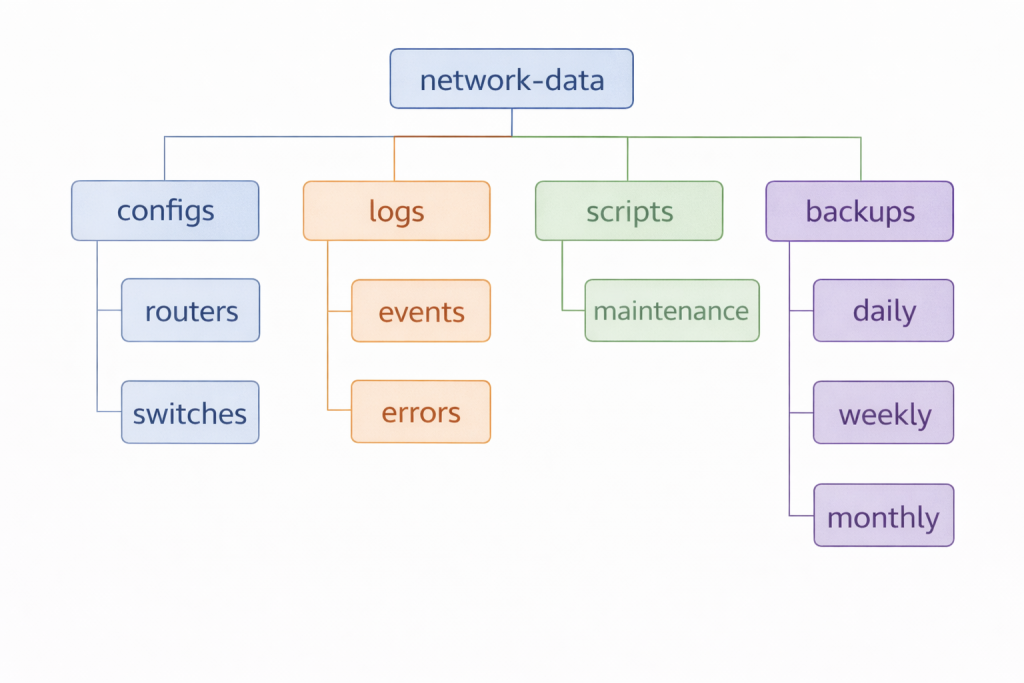
network-data/
├── configs/
│   ├── routers/
│   ├── switches/
│   ├── firewalls/
│   └── wireless/
├── logs/
├── scripts/
├── backups/
│   ├── daily/
│   ├── weekly/
│   └── monthly/
└── documentation/
Understanding the Structure
Proper organized structure for network automation and Linux learning with our future dummy data.
Device configs go in configs/device-type. Logs go in logs. Your automation scripts go in scripts. Backups organized by retention period.
Navigate around it:
cd network-data
ls -l
cd configs/routers
pwd
cd ../switches
ls -l
cd ~/network-data/backups
ls -l
cd -
Practice Navigation
Practice moving around until it feels natural.
When you start collecting real configs from devices, you’ll copy them into this structure. When you write backup scripts, they’ll save files here. When you analyze logs, you’ll work from here.
Having a proper structure from the start makes everything easier later.
Quick Reference
Here’s the commands we covered:
pwd – shows your current directory
ls – lists files in current directory
ls -l – detailed list with permissions and sizes
ls -la – shows all files including hidden ones
ls -lh – human-readable file sizes
cd directory – changes to specified directory
cd ~ or cd – go to home directory
cd .. – move up one directory level
cd – – go back to previous directory
That’s your basic navigation sorted. You can move around Linux, see what’s where, organize files properly.
Next lesson we’ll look at viewing files. cat, less, head, tail. Actually reading what’s in those config files you’re organizing.
For now practice moving around. Create that network-data structure. Get comfortable with pwd, ls, cd. Make it automatic.
When you can navigate without thinking about it, you’re ready to move on.
External Link: Linux Filesystem Hierarchy Standard – official documentation explaining where everything goes in Linux