
lets have a blast with automating server configuration

In this post, we’ll cover the fourth lab in the Ansible series, focusing our routers and automating server configuration for NTP (Network Time Protocol). This lab introduces the integration of an Ubuntu server as an NTP server, aligning with real-world scenarios where network engineers often handle both networking and server tasks. We’ll walk through adding the server to the inventory, configuring the server as an NTP source, and updating router configurations for accurate time synchronisation.
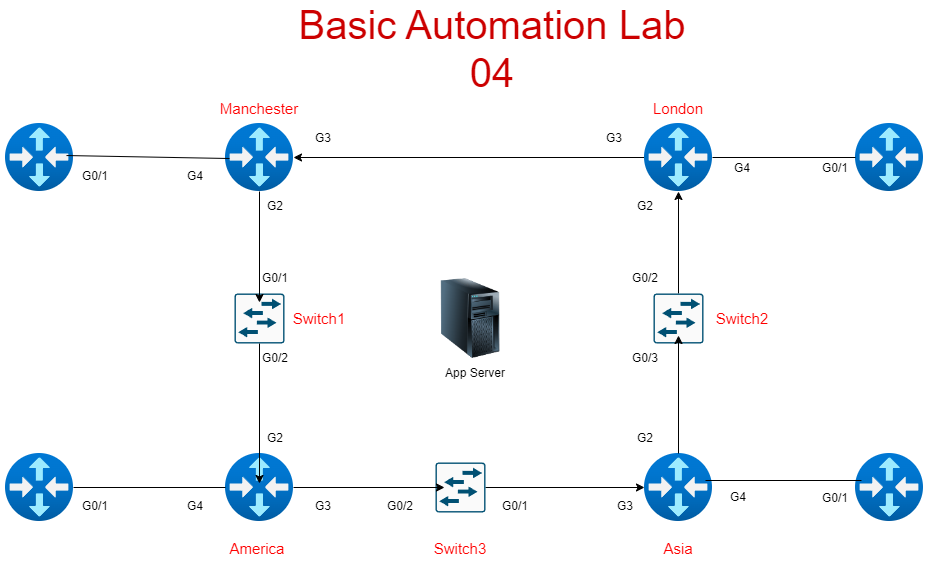
Scenario Overview
Your manager has tasked you with setting up basic NTP functionality for your lab. This includes:
- Adding the Ubuntu application server to your Ansible host file.
- Configuring the server to act as an NTP server.
- Updating router configurations to use the newly added server for time synchronisation.
- Verifying that NTP is working correctly across all devices.
Step 1: Updating the Ansible Host File
Add the Ubuntu server to your Ansible inventory. The inventory file should already contain your routers and edge devices, so this step simply adds the app server details:
[routers]
London ansible_host=192.168.47.194
Manchester ansible_host=192.168.47.132
Asia ansible_host=192.168.47.226
America ansible_host=192.168.47.217
[routers:vars]
ansible_user=YouTube
ansible_ssh_pass=YouTube1
ansible_port=22
ansible_connection=network_cli
ansible_network_os=cisco.ios.ios

[edge]
R1 ansible_host=192.168.47.21
R2 ansible_host=192.168.47.22
R3 ansible_host=192.168.47.23
R4 ansible_host=192.168.47.24

[edge:vars]
ansible_user=YouTube
ansible_ssh_pass=YouTube1
ansible_port=22
ansible_connection=network_cli
ansible_network_os=cisco.ios.ios

[servers]
app-server ansible_host=192.168.47.200

[servers:vars]
ansible_user=sysadmin
ansible_ssh_pass=sysadmin123
ansibe-become=yes
ansible_become_method=sudo
ansible_become_password=sysadmin123
Step 2: Creating the NTP Server Playbook
Next, create a playbook to set up the Ubuntu server as an NTP server. This playbook installs the chrony package, configures the server to allow connections from your subnet, and ensures the necessary firewall rules are applied:
Playbook Name: ntp_server.yml
---
- name: NTP Server Setup
  hosts: servers
  become: yes
  tasks:
    - name: Install NTP server
      apt:
        name: chrony
        state: present
        update_cache: yes

    - name: Configure chrony as an NTP server
      lineinfile:
        path: /etc/chrony/chrony.conf
        regexp: '^pool '
        line: "# Commented by Ansible"
        state: present

    - name: Add local server configuration
      lineinfile:
        path: /etc/chrony/chrony.conf
        line: "allow 192.168.47.0/24"
        create: yes

    - name: Restart the chrony service
      systemd:
        name: chrony
        enabled: yes
        state: restarted

    - name: Allow NTP through the firewall
      ufw:
        rule: allow
        port: 123
        proto: udp
        comment: "Allow NTP traffic"
What It Does:
- Installs the NTP Package (
chrony):
The first task installs thechronypackage, which is the preferred NTP daemon on most modern Linux distributions. Unlike the olderntpd,chronyis better at maintaining accurate time in environments with varying network conditions.update_cache: yesensures the package lists are up to date, avoiding issues if the server hasn’t updated its repositories recently.state: presentguarantees that the package is installed, whether or not it was previously missing. - Configures the NTP Server (
chrony.conf):
This task modifies thechrony.conffile to prevent external pool servers from being used, which can introduce unwanted time offsets. It also adds a line to permit local clients on the 192.168.47.0/24 subnet to use this server for NTP.
Thelineinfilemodule is ideal here because it allows precise editing of configuration files without overwriting the entire file.
Theregexpoption targets specific lines, ensuring you don’t accidentally duplicate settings. - Adds Local Network Configuration:
This task adds a line to the configuration file, permitting devices on the 192.168.47.0/24 subnet to use the server as a time source.
This is essential for lab environments where the NTP server is on the same subnet as the devices.
Without this line, the server would reject NTP requests from your routers, breaking the time sync setup. - Restarts the NTP Service:
Modifying the configuration, the service must be restarted to apply the changes.
This ensures thechronyservice is not only restarted but also enabled to start automatically on reboot, maintaining time sync reliability. - Updates Firewall Rules:
Ensures that UDP traffic on port 123 (the NTP port) is allowed through the server’s firewal.
Without this step, NTP traffic would be blocked, making the server unreachable for time sync.
Running the Ansible Playbook
You run this playbook with ansible-playbook ntp_server.yml which is the last part of the section for automating server configuration and you should see the below
PLAY [NTP Server Setup] **************************
TASK [Install NTP server] ***********************
changed: [app-server]
TASK [Configure chrony as an NTP server] ********
changed: [app-server]
TASK [Add local server configuration] ***********
changed: [app-server]
TASK [Restart the chrony service] ***************
changed: [app-server]
TASK [Allow NTP through the firewall] ***********
changed: [app-server]
PLAY RECAP **************************************
app-server : ok=5 changed=5 unreachable=0 failed=0 skipped=0 rescued=0 ignored=0
Step 3: Configuring Routers to Use the NTP Server
playbook is used to push the NTP server configuration to all routers and edge devices in your lab.
Playbook Name: ntp_clients.yml
---
- name: Configure NTP
  hosts: edge,routers
  gather_facts: no
  connection: network_cli
  tasks:
    - name: Add NTP server
      cisco.ios.ios_config:
        lines:
          - ntp server 192.168.47.200 prefer minpoll 4 maxpoll 4
Running this playbook with ansible-playbook ntp_clients.yml will produce
PLAY [Configure NTP] *****************************
TASK [Add NTP server] ***************************
changed: [R1]
changed: [R2]
changed: [R3]
changed: [R4]
changed: [London]
changed: [Manchester]
changed: [Asia]
changed: [America]
PLAY RECAP **************************************
R1 : ok=1 changed=1 unreachable=0 failed=0 skipped=0 rescued=0 ignored=0
R2 : ok=1 changed=1 unreachable=0 failed=0 skipped=0 rescued=0 ignored=0
R3 : ok=1 changed=1 unreachable=0 failed=0 skipped=0 rescued=0 ignored=0
R4 : ok=1 changed=1 unreachable=0 failed=0 skipped=0 rescued=0 ignored=0
London : ok=1 changed=1 unreachable=0 failed=0 skipped=0 rescued=0 ignored=0
Manchester : ok=1 changed=1 unreachable=0 failed=0 skipped=0 rescued=0 ignored=0
Asia : ok=1 changed=1 unreachable=0 failed=0 skipped=0 rescued=0 ignored=0
America : ok=1 changed=1 unreachable=0 failed=0 skipped=0 rescued=0 ignored=0
Step 4: Verifying the NTP Configuration
This playbook is designed to verify that your routers are correctly configured for NTP, It runs a set of show commands to check the status of NTP associations and ensure that time synchronisation is working as expected.
Playbook Name: ntp_verify.yml
---
- name: Check NTP
  hosts: edge,routers
  gather_facts: no
  connection: network_cli
  tasks:
    - name: Check routers for NTP
      cisco.ios.ios_command:
        commands:
          - show ntp associations
          - show ntp status
      register: output

    - name: Display output of commands
      debug:
        msg: "{{ output.stdout_lines }}"
Running the playbook with the following ansible-playbook ntp_verify.yml will display the NTP status for each device:
ok: [America] => {
    "msg": [
        [
            "address         ref clock       st   when   poll reach  delay  offset   disp",
            " ~192.168.47.200  .TIME.          16     27     16     0  0.000   0.000 16000.",
            " * sys.peer, # selected, + candidate, - outlyer, x falseticker, ~ configured"
        ]
    ]
}

PLAY RECAP **************************************************************************************************************************************************
America                    : ok=2    changed=0    unreachable=0    failed=0    skipped=0    rescued=0    ignored=0
Asia                       : ok=2    changed=0    unreachable=0    failed=0    skipped=0    rescued=0    ignored=0
London                     : ok=2    changed=0    unreachable=0    failed=0    skipped=0    rescued=0    ignored=0
Manchester                 : ok=2    changed=0    unreachable=0    failed=0    skipped=0    rescued=0    ignored=0
R1                         : ok=2    changed=0    unreachable=0    failed=0    skipped=0    rescued=0    ignored=0
R2                         : ok=2    changed=0    unreachable=0    failed=0    skipped=0    rescued=0    ignored=0
R3                         : ok=2    changed=0    unreachable=0    failed=0    skipped=0    rescued=0    ignored=0
R4                         : ok=2    changed=0    unreachable=0    failed=0    skipped=0    rescued=0    ignored=0
Next Steps
With this lab complete, we are well on our way to mastering network automation with Ansible. In the next lessons, we’ll add users and device hardening, building a robust, automated network environment and you can always follow the IP addressing and Loopback post incase you missed it.
Pingback: Workbook 05 Ansible Configuration for Cisco and Juniper Loops and With Statements - RichardKilleen