

Ansible Workbook 05 – Multi-Vendor Ansible Configuration for Cisco and Juniper
Welcome to Workbook 05 in my Ansible series. In this session, I’m moving beyond basic device automation and tackling multi-vendor environments, focusing on Ansible configuration for Cisco and Juniper routers in an unified network. I’ll walk you through building vendor-specific playbooks, optimising host and group variable management, and understanding the importance of using the right connection methods for each platform.
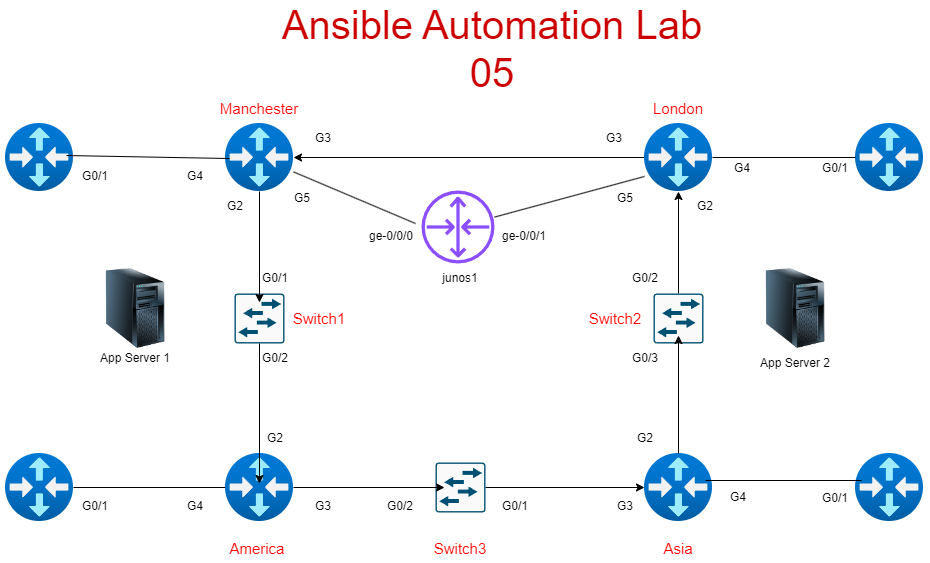
Scenario Overview
In this lab, I’ve been tasked with integrating the newly introduced Juniper Junos1 router into the existing Cisco network. We will pick on poor NTP again as the configurations are simple for demonstration. I’ll also cover why it’s essential to separate host and group variables for cleaner, more maintainable playbooks.
Understanding Ansible Host and Group Variables
Before jumping into the playbooks, it’s essential to understand why I’m moving the variables out of the main inventory file. When I first started building these workbooks, I included all my variables directly in the host file, which can quickly become unmanageable as the network grows. Moving these into dedicated host_vars and group_vars directories not only keeps the inventory file clean but also makes the playbooks more portable and easier to debug.
Ansible processes variables in the following order of precedence:
- Host Variables – Most specific, defined in the host_vars/ directory, allowing device-specific settings and this means we can be granular to the device level while overiding the last two sets of variables.
- Group Variables – Applied to groups of devices, defined in the group_vars/ directory, making it easier to manage large device pools, this is not as granular and the above but is still good for keeping the main hosts file short and simple.
- Inventory File Variables – Least specific, defined directly in the main inventory file, typically used for default settings but it can grow to be overwhelming with lots of hosts.
Here’s the updated hosts file for this lab:
[routers]
London ansible_host=192.168.122.194
Manchester ansible_host=192.168.122.132
Asia ansible_host=192.168.122.226
America ansible_host=192.168.122.217

[edge]
R1 ansible_host=192.168.122.21
R2 ansible_host=192.168.122.22
R3 ansible_host=192.168.122.23
R4 ansible_host=192.168.122.24

[junos]
Junos1 ansible_host=192.168.122.101
This structure is much cleaner and separates device-specific settings, like management IP addresses, from general configuration parameters.
Juniper in Ansible Requires Special Handling
Unlike Cisco devices, which use network_cli for SSH-based communication, Juniper devices typically rely on Netconf. This protocol provides a structured, XML-based interface for device management, making it more efficient and secure for Juniper routers.
For Junos devices, you must use the netconf connection type, as shown below and in addition you will need to ensure netconf is enabled on the juniper device.
ansible_network_os: junos
ansible_connection: netconf
ansible_ssh_user: YouTube
ansible_ssh_pass: YouTube1
Understanding Ansible Modules for Cisco and Juniper
Both Cisco and Juniper have vendor-specific modules for most types of management. These modules are part of the cisco.ios and junipernetworks.junos collections, which you can find on the Ansible website . They provide structured, reliable methods for configuring targeted configuration without resorting to raw CLI commands, reducing the risk of syntax errors and improving playbook readability and each module page has example playbooks to guide you
Again we are picking on poor old NTP.
- Cisco NTP Module: cisco.ios.ios_ntp_global – This module is designed for global NTP configuration on Cisco IOS devices. It supports multiple peers, authentication settings, and source interfaces, making it highly flexible for enterprise deployments. It’s part of the cisco.ios collection, which you can install with:
- Juniper NTP Module: junipernetworks.junos.junos_ntp_global – This module handles NTP configuration on Junos devices via Netconf. It offers similar capabilities to the Cisco module, including peer management and server authentication, but uses the structured data model typical of Junos. You can install it with:
You can find the full documentation for these modules on the Ansible website, which is an essential resource when building playbooks. It includes examples, parameter descriptions, and usage guidelines for each module, helping you avoid common pitfalls.
Breaking Down the Playbook Logic – Vars, Loops, and When Statements
The vars, loop, and when statements in Ansible playbooks are essential for flexible, scalable automation. In our NTP configuration playbook, I use these elements to handle Ansible Configuration for Cisco and Juniper devices without duplicating code.
- Vars: Variables are defined at the task level to keep the playbook flexible. This allows me to quickly adjust the list of NTP servers without modifying the core logic.
- Loop: The loop keyword is used to iterate over a list of items, in this case, the NTP server addresses. This is more efficient than writing separate tasks for each server and keeps the playbook clean.
- When Statements: These ensure that tasks are only executed on the appropriate devices, preventing configuration errors and improving reliability and this will match the network_os that you have set in your host, host_var or group_var files.
   ---
- name: Add Multi-Vendor NTP
  hosts: all
  gather_facts: no
  vars:
    ntp_servers:
      - "192.168.122.100"
      - "192.168.122.8"

  tasks:
    - name: Add NTP Cisco
      cisco.ios.ios_ntp_global:
        config:
          peers:
            - peer: "{{ item }}"
      loop: "{{ ntp_servers }}"
      when: ansible_network_os == "cisco.ios.ios"

    - name: Add NTP Junos
      junipernetworks.junos.junos_ntp_global:
        config:
          peers:
            - peer: "{{ item }}"
      loop: "{{ ntp_servers }}"
      when: ansible_network_os == "junos"
Final Steps and Validation
With these playbooks in place, I can now validate my NTP configuration using the show ntp playbook below to confirm that the settings have been applied correctly.
As Cisco and Juniper use slightly different commands we have split the code into vendor blocks again to ensure that only targeted command are sent to the correct devices.
This is a critical step before moving on to more complex automation tasks.
---

- name: show ntp
  hosts: edge, routers, junos
  gather_facts: no

  tasks:
    - name: display ntp cisco
      cisco.ios.ios_command:
        commands:
          - show ntp config
          - show ntp associations
          - show ntp packets
      register: cisco_ntp
      when: ansible_network_os == "cisco.ios.ios"

    - name: display cisco ntp
      debug:
        msg: "{{ cisco_ntp.stdout_lines  }}"
      when: ansible_network_os == "cisco.ios.ios"

    - name: display junos ntp
      junipernetworks.junos.junos_command:
        commands:
          - show ntp associations
          - show ntp status
      register: junos_ntp
      when: ansible_network_os == "junos"

    - name: display junos output
      debug:
        msg: "{{ junos_ntp.stdout_lines }}"
      when: ansible_network_os == "junos"
Next Steps
With this workbook complete, I’ve established a solid foundation for Ansible Configuration for Cisco and Juniper. In the next session, I’ll build on this by introducing more advanced use cases and integrations. Stay tuned for Workbook 06 and if you missed the last workbook regarding Ansible server configuration
Pingback: OSPF configuration with Ansible and Jinja2 templates Lab 06 - RichardKilleen