

In this post, we’re going to cover the process of OSPF configuration with Ansible and Jinja2 templates for Cisco routers, based on the setup in Lab 06 and is a direct follow on from Lab 05 and dont forget to check out the related GitHub repo for this lab.
I’ll walk you through everything from host and group variable files to building your Jinja2 templates and writing the playbooks to apply these configurations. I’ll also touch on variable inheritance, why it matters, and how to avoid common pitfalls when scaling your automation.
Lab Scenario
For this lab, management has asked us to enable OSPF on our Cisco routers in preparation for further testing before the network goes live. This involves:
- Setting up host_vars and group_vars for device-specific and group-wide settings.
- Creating a Jinja2 template to simplify OSPF configurations.
- Writing playbooks to deploy and verify the configurations.
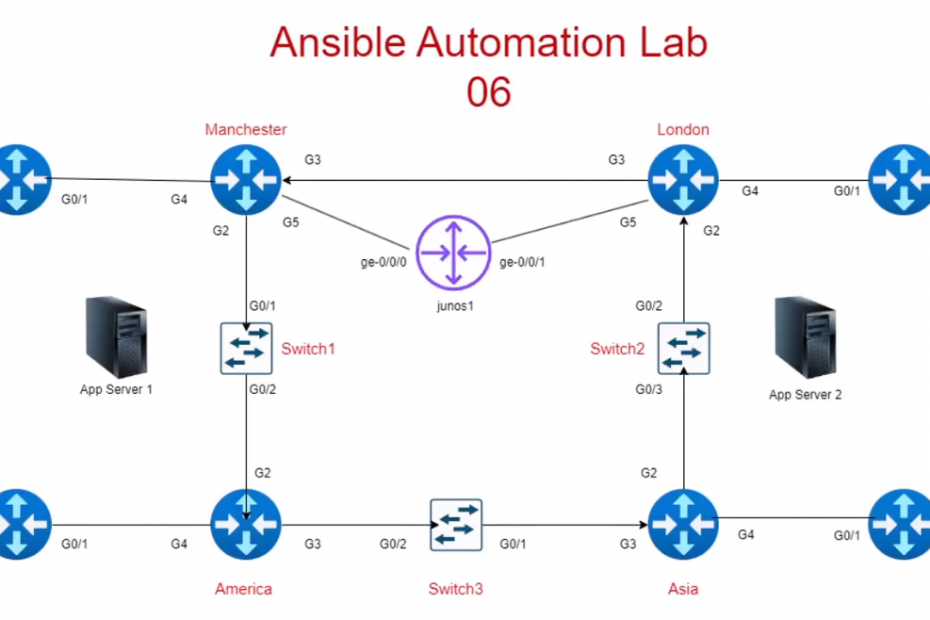
The network topology includes the following routers:
- Core Routers (Area 0)
- London, Manchester, America, Asia
- Edge Routers (Areas 1-4)
- R1 (Area 1) R2 (Area 2) R3 (Area 3) R4 (Area 4)
Understanding Host and Group Variables in Ansible
Ansible uses a hierarchical approach to variable management, where each level has its own precedence:
- Playbook Variables – Highest precedence, overrides all others.
- Host Variables – Device-specific settings.
- Group Variables – Shared settings for multiple devices.
- Defaults and Facts – Lowest precedence, often used as a fallback.
Host Variables (Host-Specific Settings)
Host variable files are where you define device-specific settings like connection details, OSPF processes, and interfaces. This approach makes your configurations scalable, easier to maintain, and more closely aligned with real-world network management practices.
(America.yml host file)
---
ansible_host: 192.168.122.214
ansible_connection: network_cli
interfaces:
  - name: GigabitEthernet0/0
    description: "Core Link to Manchester"
    ip_address: 10.0.0.1
    subnet_mask: 255.255.255.0
ospf_process:
  - process_id: 1
    router_id: 1.1.1.1
    networks:
      - address: 10.0.0.0
        wildcard_bits: 0.0.0.255
        area:0
NTP:
  - server: 100.100.100.1
This structure which is considered to be best practice allows us to define everything from IP addresses to OSPF process details in a dedicated file for each device. This is particularly useful as networks grow and configurations become more complex.
Group Variables (Shared Settings)
Group variables are used for settings that apply to multiple devices, like NTP servers, global OSPF timers, or default SNMP settings. These live in the group_vars/ directory and have a lower precedence than host variables, meaning device-specific settings will override group settings when conflicts arise.
(routers.yml group vars)
---
ntp_servers:
  - 192.168.122.101
  - 192.168.122.8
In this example, the NTP server settings will apply to all devices in the group, unless explicitly overridden in a host variable file above it so all devices in the routers group will have the ntp server 192.168.122.8 and .101 however America will have the NTP server applied of 100.100.100.1. This is an example of variable inheritance .
Once Ansible locates a matching variable if no longer looks for a broader match – just link in longest prefix routing the more specific the match the more preferable it is.
Why Use Host and Group Variables Separately?
It’s tempting to just throw everything into your main playbooks and of course in a lab environment where you might only have a handful of devices to automate with ansible so it is not an issue, but separating host and group variables is a best practice for a few reasons:
- Scalability – As your network grows, keeping device-specific settings separate makes it easier to manage.
- Consistency – It helps avoid configuration drift, where different devices have inconsistent settings.
- Flexibility – You can override group settings at the host level, giving you more control.
For example, you might have a group variable for NTP ( i know we pick on poor NTP a lot ) servers, but a specific router that requires a different server for testing purposes. In that case, you’d override the group setting with a host variable, which takes precedence.
Automating Host Variable Generation with get_interfaces
Manually creating host variable files can be time-consuming and error-prone, especially as your network scales. This is where a script like get_interfaces comes in handy.
The get_interfaces script can automate the process by pulling data directly from your devices using Ansible’s facts module and an underlying jinja2 template. It captures key information like interface names, IP addresses, subnet masks, and descriptions, then populates the host variable files accordingly.
Here’s what the scrip does:
- Connect to each device using the ios_facts module.
- Iterates through the interface_template.j2 file to build the commands required for forloops.
- Extract interface data in the format that cisco_facts.ansible_facts.ansible_net_interfaces can display.
- Populate a YAML file with the extracted information.
(interfaces_template.j2)

interfaces:
{% for intf_name, intf_data in interfaces.items() %}
  - name: {{ intf_name }}
    description: "{{ intf_data.get('description', 'No description') }}"
{% if intf_data.get('ipv4') is iterable %}
{% for ip in intf_data.get('ipv4', []) %}
    ip_address: "{{ ip.get('address', 'No IP') }}"
    subnet_mask: "{{ ip.get('subnet', 'No Mask') }}"
{% endfor %}
{% else %}
    ip_address: "No IP"
    subnet_mask: "No Mask"
{% endif %}
{% endfor %}
(get-interfaces.yml)
---
- name: Gather Interfaces in YAML Format
hosts: routers
gather_facts: no
tasks:
- name: Gather Cisco IOS Interface Facts
cisco.ios.ios_facts:
gather_subset: interfaces
register: cisco_facts
- name: Format Interface Data (Cisco)
template:
src: templates/interfaces_template.j2
dest: "host_vars/{{ inventory_hostname }}.yml"
vars:
interfaces: "{{ cisco_facts.ansible_facts.ansible_net_interfaces }}"
(Added to host var file)

interfaces:
  - name: GigabitEthernet 1
    description: ""
    ip_address: "192.168.122.217"
    subnet_mask: "255.255.255.0"
  - name: GigabitEthernet 2
    description: "Manchester-G2"
    ip_address: "172.16.20.2"
    subnet_mask: "255.255.255.0"
  - name: GigabitEthernet 3
    description: "Asia-G3"
    ip_address: "172.16.30.1"
    subnet_mask: "255.255.255.0"
  - name: GigabitEthernet 4
    description: "R4-G2"
    ip_address: "10.0.4.2"
    subnet_mask: "255.255.255.0"
  - name: GigabitEthernet 5
    description: ""
  - name: GigabitEthernet 6
    description: ""
  - name: Loopback 0
    description: "Main-Loopback"
    ip_address: "4.4.4.4"
    subnet_mask: "255.255.255.255"
This approach not only saves you time but also reduces the risk of human error. It’s especially useful in labs where device configurations change frequently.
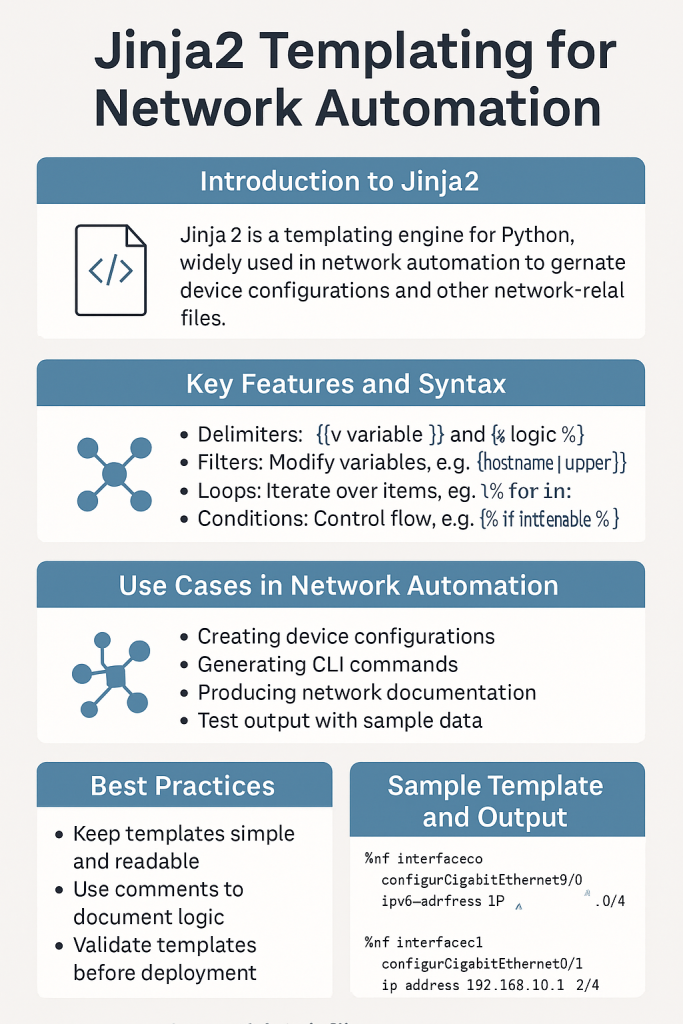
OSPF configuration with Ansible and Jinja2 templates
Next, we’ll create the Jinja2 template that will dynamically generate the OSPF configurations based on the host variables.
Create a file called ospf_config.j2 in the templates/ directory:
router ospf {{ ospf_process.process_id }}
 router-id {{ ospf_process.router_id }}
{% for network in ospf_process.networks %}
 network {{ network.address }} {{ network.wildcard_bits }} area {{ network.area }}
{% endfor %}
This template uses a Jinja2 for loop to iterate over each network entry in the host variable file, ensuring that all OSPF networks are included in the final configuration and below we can see what data is being extracted from R1.yml host file.
ospf_processes:
  - process_id: 2
    router_id: 100.100.100.1
    networks:
      - address: 10.0.1.0
        wildcard_bits: 0.0.0.255
        area: 1
      - address: 100.100.100.1
        wildcard_bits: 0.0.0.0
        area: 1
Writing the Ansible Playbook for OSPF Deployment
Now, let’s create the playbook to deploy our OSPF configurations. This will use the cisco.ios.ios_config module to push the Jinja2-generated configurations to each device.
Create a new file called add_ospf.yml:
Writing the Ansible Playbook for OSPF Deployment
Now, let’s create the playbook to deploy our OSPF configurations. This will use the cisco.ios.ios_config module to push the Jinja2-generated configurations to each device.
Create a new file called add_ospf.yml:
---
- name: Deploy OSPF Configuration
  hosts: routers
  gather_facts: no
  tasks:
    - name: Deploy OSPF
      cisco.ios.ios_config:
        lines:
          - "router ospf {{ ospf_process.process_id }}"
        parents: []
      vars:
        ospf_process: "{{ ospf_processes[0] }}"
This playbook pulls the ospf_process data from the host variable files, ensuring each router gets the correct OSPF configuration.
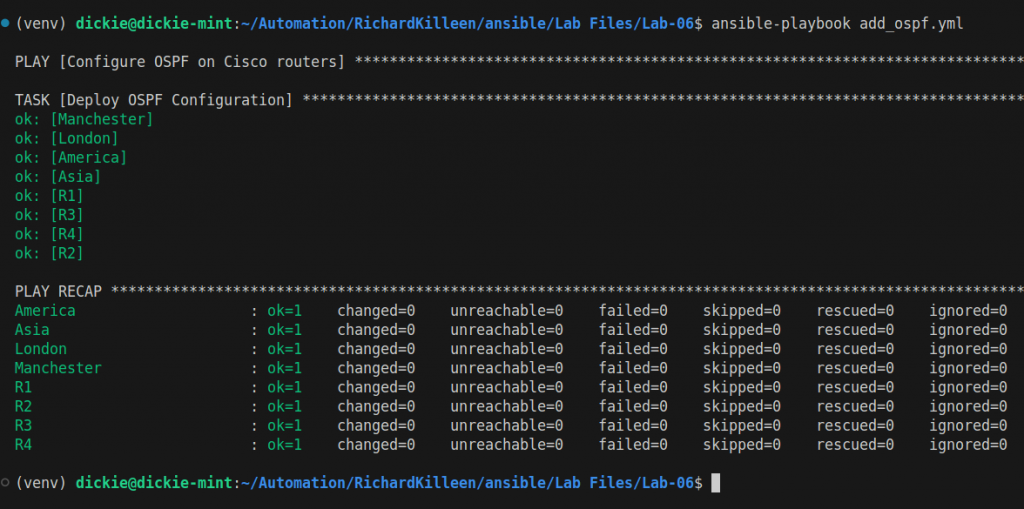
Note that the above output shows changed=0 this is because the playbook was run again just to get an output for you, OSPF was already configured via the playbook prior to the blog post, if this was the first time the playbook was run and OSPF configuration was added the output would have shown changed=1
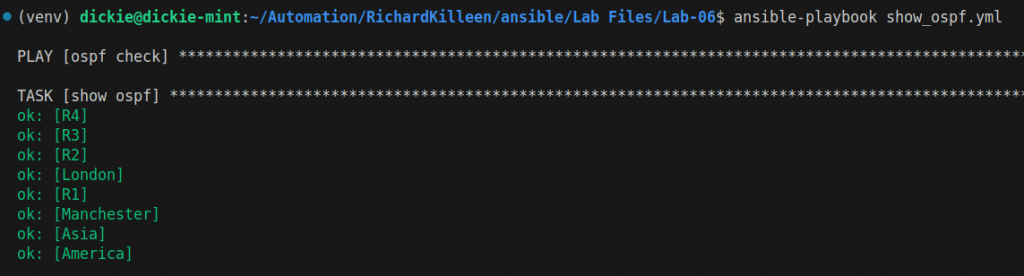
Testing OSPF Configuration
After running the playbook for OSPF configuration with Ansible and Jinja2 templates, it’s a good idea to verify that everything is working as expected. We can write a simple Ansible playbook that runs OSPF show commands on the routers to check OSPF neighbour relationships and routing tables.
Create a file called verify_ospf.yml:
---
- name: Verify OSPF Configuration
hosts: routers
gather_facts: no
tasks:
- name: Show OSPF Neighbors
cisco.ios.ios_command:
commands:
- show ip ospf neighbor- show ip route ospf
register: output
- name: Display OSPF Neighbor Output
debug:
msg: "{{ output.stdout_lines }}"
This playbook does the following:
- Shows OSPF Neighbors – Runs the show ip ospf neighbor command to check OSPF neighbour relationships.
- Displays the Output – Uses the debug module to print the results to the terminal.
Sanity Check
For a quick sanity check, we can directly connect into one of the routers to confirm that the OSPF process and neighbour relationships are correctly configured.

From the above output we can see that the OSPF processes are actually running as expected and that the routing tables are populated correctly.
Join us in lab07 where we will be doing ansible configurations on Juniper and cisco routers in the same playbooks.
Nice post very informative
Pingback: Ansible Lab 07 Configuring Juniper OSPF & Cisco iBGP with Ansible - RichardKilleen
Pingback: Cisco CCIE Service provider Pratice Lab - RichardKilleen